Everybody’s webcam can get in trouble now and then. When it happens is the defining moment, and you might desperately seek help. Imagine you’re setting up for an important Zoom meeting, then suddenly your webcam fails on you – you now regret not reading enough tutorials on testing webcams.
Don’t Miss: 12 Common Webcam Problems You May Meet
A lot has changed since the early days of Windows. If you’re the nerdy type, you’d know about custom camera drivers made especially for Windows. This scenario is especially true with earlier versions such as XP. However, a lot has changed to be internet-friendly or ‘smart.’ With this, you’ll see how testing a webcam has evolved in Windows.
Method 1. Test Webcam using Built-in Camera App in Windows 10/11
The built-in Camera app of Windows came about changing with the times. The app-based approach enables the user more control of the camera’s features, including security permissions. Note that these permissions were a carry-over from Windows 7. With this, you’ll learn practical steps on testing your webcam on Windows10/11.
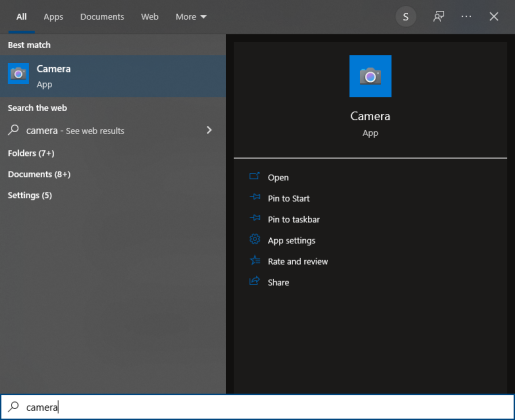
Step 1. Open the Camera app. This app should come along already installed in your Windows 10/11 system. On the search bar in your taskbar, type Camera, then click to open it.
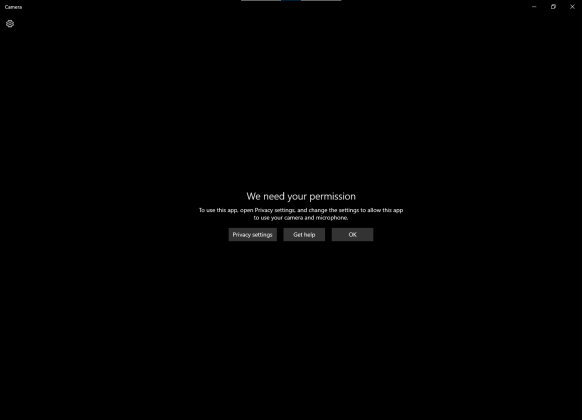
Step 2. Once opened, if your camera is okay, you should already see a moving image. If not, several factors may arise, and one is to fail to set appropriate permissions. This situation should be sensed by the camera app, as shown below.
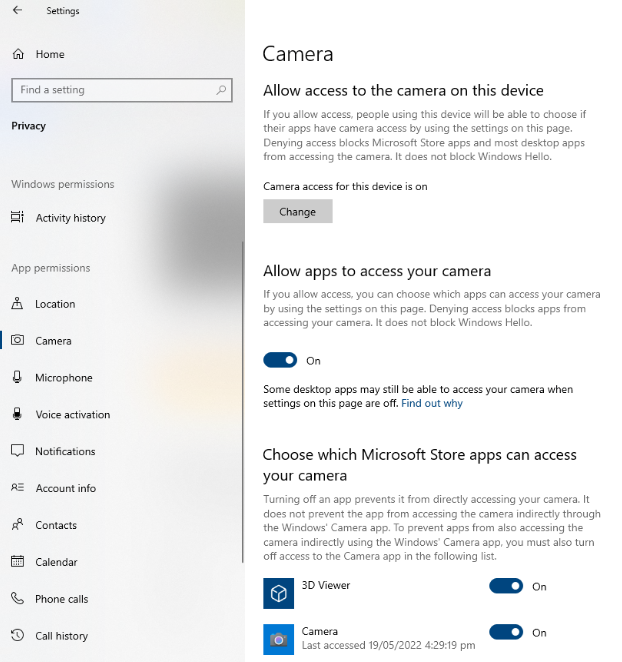
Step 3. To fix this, go to Privacy settings (as the camera app suggests), then choose camera on the choices on the left side. Alternatively, you can find this setting by going to the Start menu -> Settings -> Privacy section. Ensure the “Allow access to the camera on this device” option is enabled.
Step 4. Additionally, you can enable permission for each app or desktop app to access your device. Make sure the app you want to use for your camera is enabled.
Step 5. Note that you can go back to your Camera app once you’ve enabled all security permissions. If everything goes well, you should see your moving image. You can optionally change specific settings of your camera by clicking the gear icon on the upper left.
Method 2. How to Test webcam using Online Camera Tester
Over time, these camera device drivers have improved. They contain more information than just pictures or moving data. You can query specific parameters such as framerate, resolution, bitrates, etc. If you want to know if your webcam is behaving with its intended specs easily by only using your browser, follow the steps below.
Step 1. Go to this popular website called webcam test. Other similar websites should also be available.
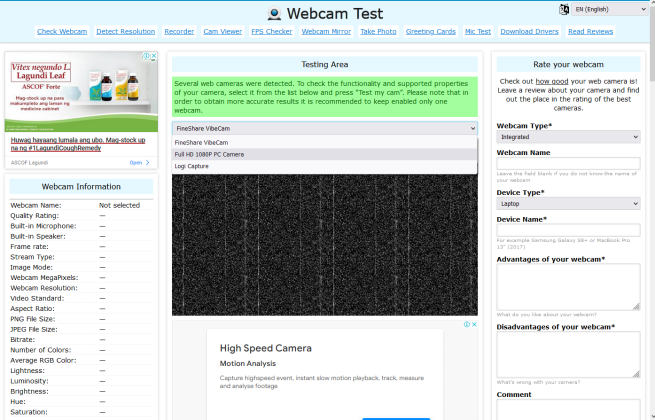
Step 2. A drop-down list menu will ask you which webcam to test. Choose your webcam, then press the Test my cam button.
Step 3. Immediately, the left-side information pane should refresh. This area will contain specific details about your webcam. It should take a while to populate all the parameters. Check your webcam’s declared specs against these.
Step 4. Optionally rate your webcam on the right side pane by filling in some information. In doing so, you’ll be able to compare your webcam’s specs against others. This procedure should help you decide what kind of webcam to buy next time.
Method 3. Test Webcam using 3rd-Party Webcam Software
You can use your favorite software or app that uses your webcam to self-test itself. It only requires you to open the app and go to its settings. This process may save you time rather than relying on third-party apps or the built-in camera app in Windows. Let’s use Skype as an example.
Step 1. Open your Skype app.
Step 2. Find the more icon on the upper left of the Skype window beside your name. Click it and choose Settings.
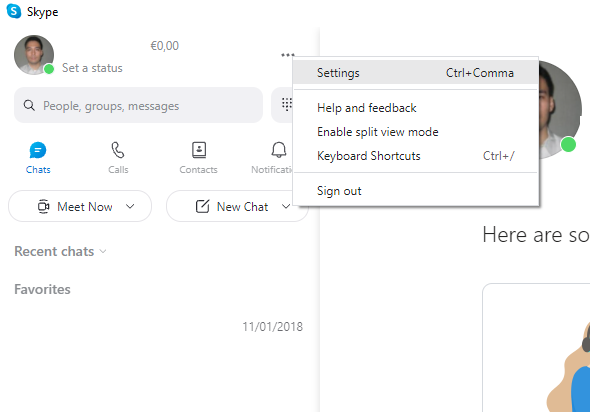
Step 3. Next, go to Audio & Video. If your camera works correctly, you should see a moving image. If not, try to change the camera source using the drop-down menu.
Step 4. Optionally change audio settings or make a free Skype test call. This procedure should set up your audio and video communications preferences according to your needs.
Conclusion
Webcam testing is done quickly through the built-in camera app of Windows, online, or third-party software. It’s your choice of what kind of approach to use. Each method ensures your camera functions correctly; however, pick what best suits your needs if you want additional test features.


