Currently, the world is interacting virtually more than ever. Since the pandemic, educational institutions have shifted to virtual classes. Remote interaction has also been a prevalent theme in the workplace. Similarly, many now connect with family and friends through video conferencing platforms. Consequently, our use of webcams has increased dramatically.
Sadly, the webcam technology on Windows computers does not seem up to par. People often have to put up with video broadcasts that have terrible exposure and color tones that aren’t true to life. No doubt, this lack of quality with webcams impacts communication extensively.
Thus, in this article, we will show you how you can adjust your color settings on your Windows 10 or Windows 11, to improve camera quality.
4 Methods to Access Webcam Color Settings on Windows Computer
Windows surprisingly do not have a general menu for Webcam settings. Nevertheless, you can still explore a couple of ways to adjust your color settings. Here are some options for adjusting webcam color settings:
Method 1. Adjust Color Settings for External Webcam (Windows 10 Default Method)
Most expensive webcams come with their own software that you can use to modify settings. However, not everyone can afford such costly webcams. Not to worry, Microsoft has provided a way to change webcam settings in Windows 10.
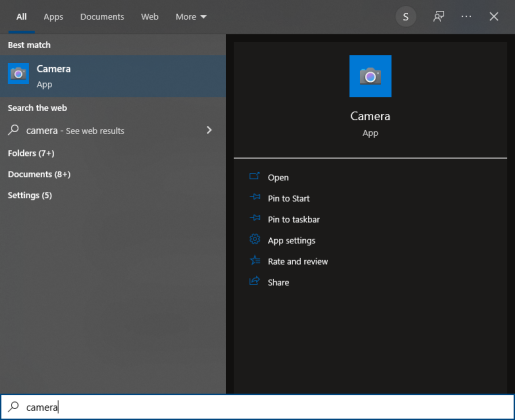
- Run the Camera app. You can access it from the Windows Start panel or you can directly search for it from the Windows search bar.
Adjust Webcam Color from Camera App
- Go to devices and click on ‘Camera’ on the left pane. After doing this, you should find a camera section that would allow you to view external webcams connected to your computer.
- Next, click on the camera you want to use and select the ‘configure’ option. You should see a couple of settings such as brightness, contrast, eye correction, dynamic range, etc.
- You can modify these settings until you are satisfied with the color tone and image quality. There is an image preview, so you can see how your changes affect the camera quality in real-time. It is worth noting that the list of settings you find in this menu depends on the features of your webcam. Hence, if your camera does not support the modification of saturation, you won’t find this option in the settings.
Modifying the color settings for a built-in webcam is a bit tricky using the Camera app. This is because it does not provide extensive settings in the regular camera app. Instead, the Camera app only lets you adjust settings like framing grid, photo resolution, etc.
Method 2. Access Webcam Color Settings from Video Meeting Apps
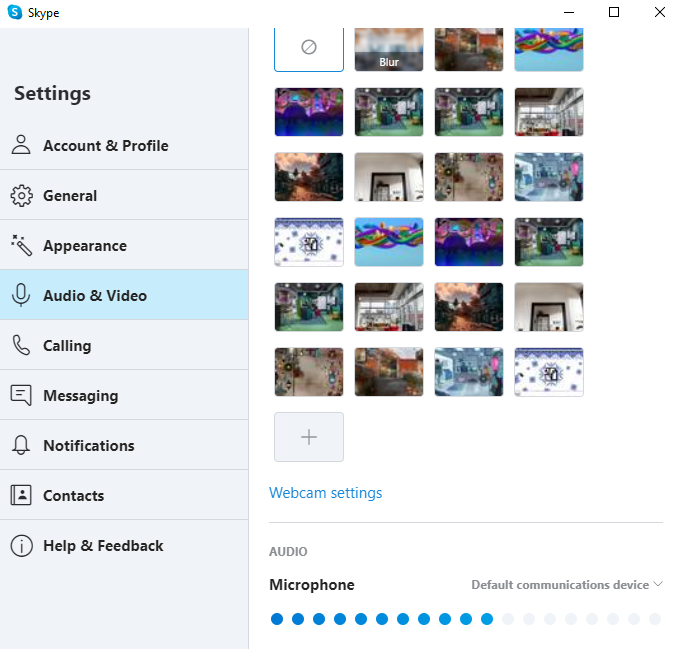
Windows has a hidden color setting access that allows you to quickly jump to Windows Camera Settings through some video conferencing apps like Skype and Microsoft Teams. For instance, on Skype, you can click Options > Settings > Audio & Video. In this window, you will find the option to access Webcam Settings, as is displayed below.
Access Webcam Settings on Windows – Skype
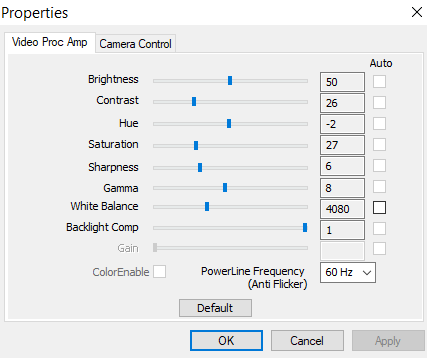
Once you click ‘webcam settings,’ you should find the properties menu that allows you to adjust brightness, contrast, hue, saturation, white balance, and sharpness. You can slide the various settings around until you find the combination that best fits your conditions.
Adjust Webcam Color Settings on Windows PC
Notably, whatever settings you make should take effect across all apps that support webcam use.
Method 3. Change PC Webcam Color, White Balance, etc using Third-Party Webcam Software
You can also adjust the color settings of your webcam using some third-party webcam software. These software applications provide even more extensive settings and may be easier to use. For example, you can use FineCam’s advanced color adjustment feature to change the color webcam settings.
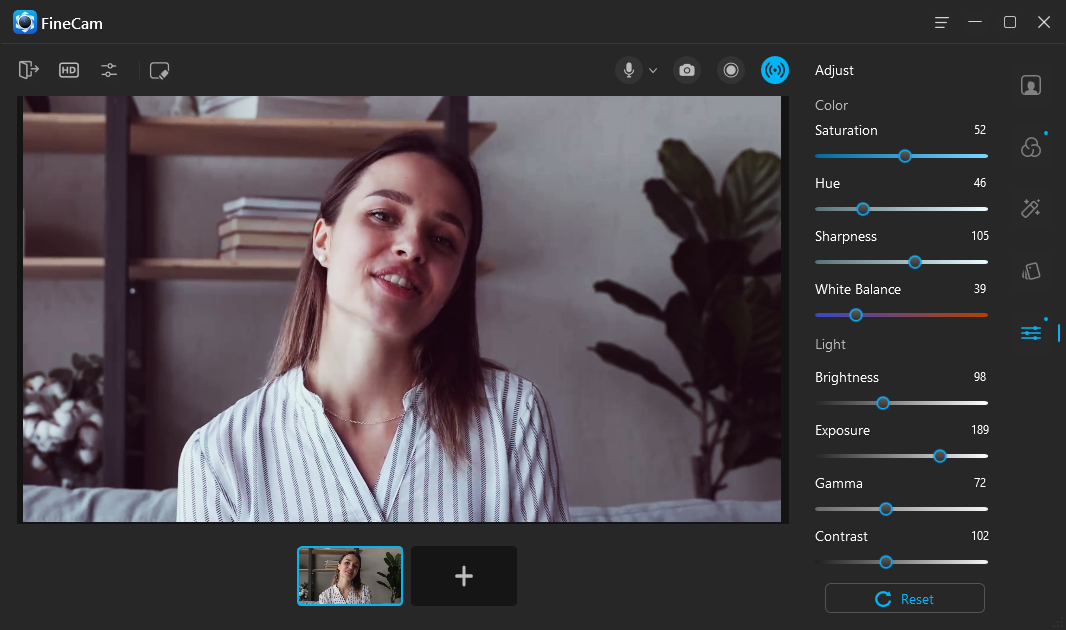
Adjust Webcam Color and Brightness – FineCam
Aptly named, this software lets you access the hidden color settings on Windows 10 or Windows 11. Thus, you can control your webcam’s brightness, contrast, hue, white balance, etc.
Besides, if your laptop’s built-in camera is so bad, you can even use this software to turn your iPhone’s HD camera into a temporary webcam. In this way, you don’t need to adjust the color since the iPhone’s smart camera will do it automatically for a stunning live video.
This application has a free edition that you can use for free before purchase. Download here to get virtual webcam software.
Method 4. How to Change Webcam Color of DSLR Camera, like Logitech
Some external webcams also provide software applications that allow you to configure the webcam extensively. For instance, if you use a Logitech camera, you can use Logitech Capture to modify a number of settings like exposure and white balance.
FAQ about Webcam Color Adjustments
1. Why Adjust Your WebCam Color Settings on Your PC
The lack of quality with PC webcams generally ruins virtual interactions. However, it is essential to note that the problem may not entirely lie with the camera hardware. Various settings also affect how your camera behaves on your computer.
In this respect, your camera’s color settings play a significant role in determining your camera’s quality. Hence, it is vital that you get these settings right to get the best out of your PC camera.
2. Which Color Adjustments Make Your Webcam Video Look Great
Major aspects of your camera’s color settings are white balance, saturation, brightness, hue, and contrast. Your webcam needs these adjustments to make your video look the best.
In particular, you want to pay attention to your white balance. White Balance is the camera setting that adjusts how colors are rendered in an image. Having the correct white balance means that colors in your photo or video would appear as close to their real-life appearance as possible. Thus, a distorted white balance results in videos with inaccurate colors. Correctly setting your saturation, contrast, and hue would also improve webcam quality.
Conclusion
With the above guide, you can easily access the color settings on your Windows 10/11 computer. However, to make the optimal adjustments that will bring out the best in your camera, it might help to learn about the different setting options and how they all impact video quality.


