Let us start this post with the profits of recording a video with a virtual background.
Why Do You Record Videos with Virtual Backgrounds?
1. Hide your cluttered space.
Virtual backgrounds can help you save a lot of time and energy cleaning up your office or room.
2. Protect your privacy.
You may have some privacy that you want to hide from your audience, or you don’t want others around you to disturb the recording, that’s when you need the help of virtual background.
3. Show your professionalism.
You can’t be sure that every time you attend a webinar or record a podcast, you’ll be in a quiet cafe or a tidy office. A virtual backdrop can help you block out other distractions no matter what environment you’re in.
4. Keep the audience focused.
Using a virtual backdrop helps you keep your audience’s attention on you and what you are saying, without being distracted by other irrelevant factors.
5. Build your brand.
You can add your branding elements, such as a logo, or brand message, to your virtual background to create your brand identity.
Virtual backgrounds are not as easy to get as you might think. Unfortunately, the camera software built into your computer, whether for Windows or Mac, does not offer virtual backgrounds.
How can you get help when you want to record videos with virtual backgrounds? This is where professional webcam software comes in handy
FineCam is an excellent webcam software with perfect features. Not only can you use iPhone as a webcam for live streaming, online meetings, online classes, etc., but it also has thousands of virtual backgrounds.
This video recorder with virtual background enables you to upload videos as backgrounds or choose PPT slides, web pages, and YouTube videos as your virtual backgrounds to greatly increase the richness and fun of your videos.
Below I will explain in detail how to record video with a virtual background in FineShare FineCam.
Step 1. Download and install FineCam on your computer.
Step 2. Launch FineCam and click the plus icon at the bottom bar to add a scene.
You can choose to connect your phone or an internal or external camera as a webcam. Please check this post on how to get how to use multiple cameras in FineCam.
Step 3. After adjusting your angle, click the Background icon in the sidebar. You can blur and remove the background of your video with or without a green screen.
Or more conveniently, just click one of the virtual backgrounds provided below to replace your webcam background.
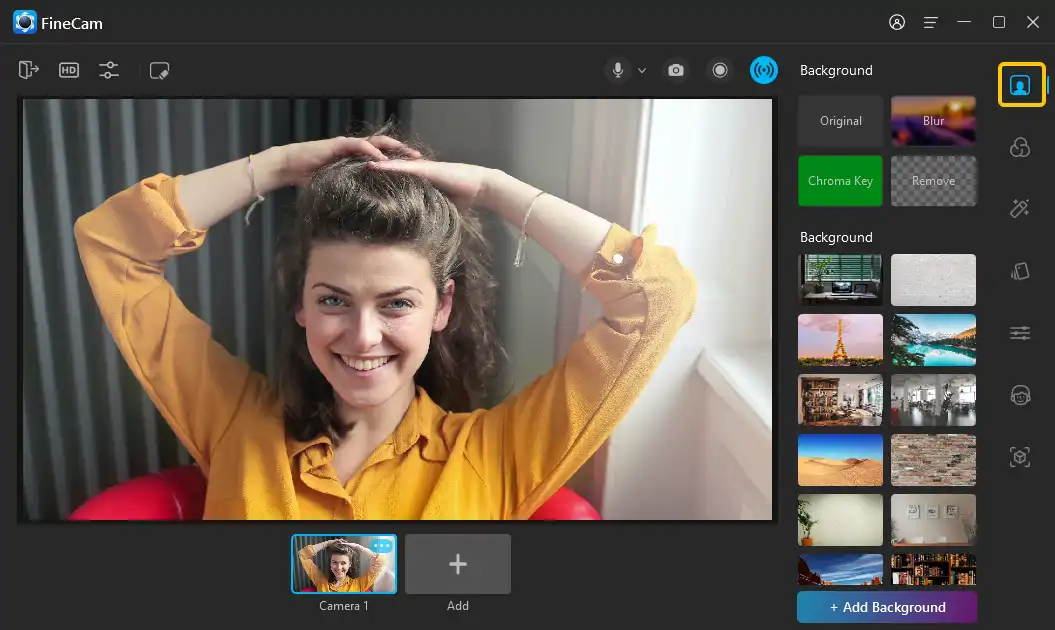
Step 4. You can see that there are only a dozen or so backgrounds on this list. How do you find the other virtual backgrounds that FineCam provides?
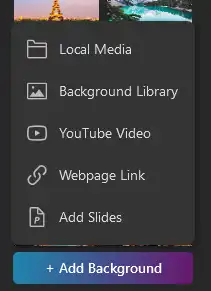
Click the +Add Background below and select Background Library.
In the library, you can look for backgrounds under different categories, or you can search by entering keywords in the search box.
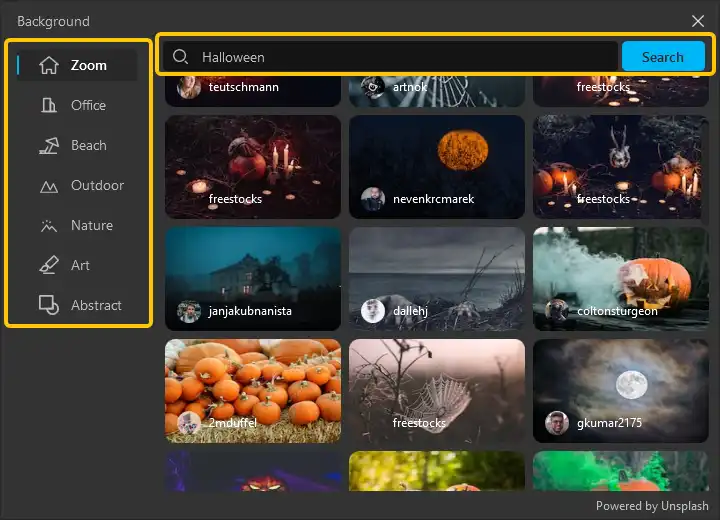
Step 5. Select the background you want and close the Background Library window. The image you just selected will appear at the top of the background list. Click to apply it.
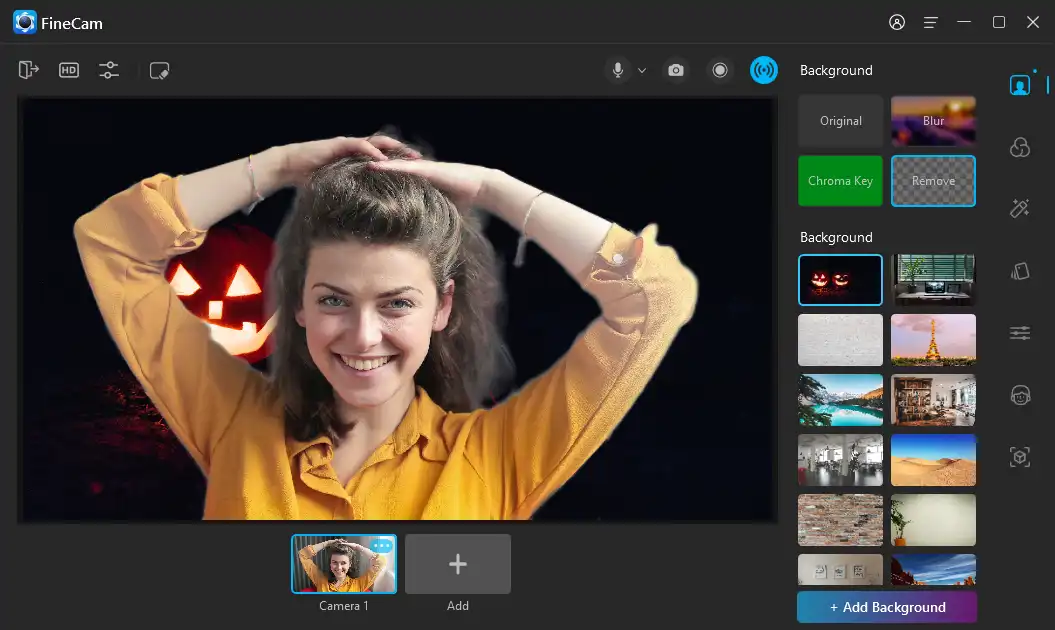
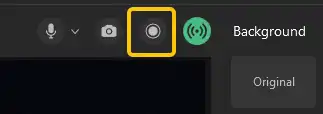
Step 6. Click the Record button in the upper right corner of your video to start recording.
You can switch the microphone you want to use, pause or stop recording from the recording control bar.

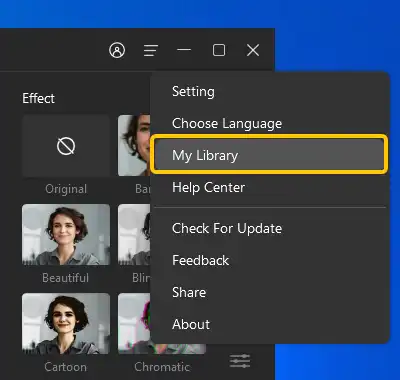
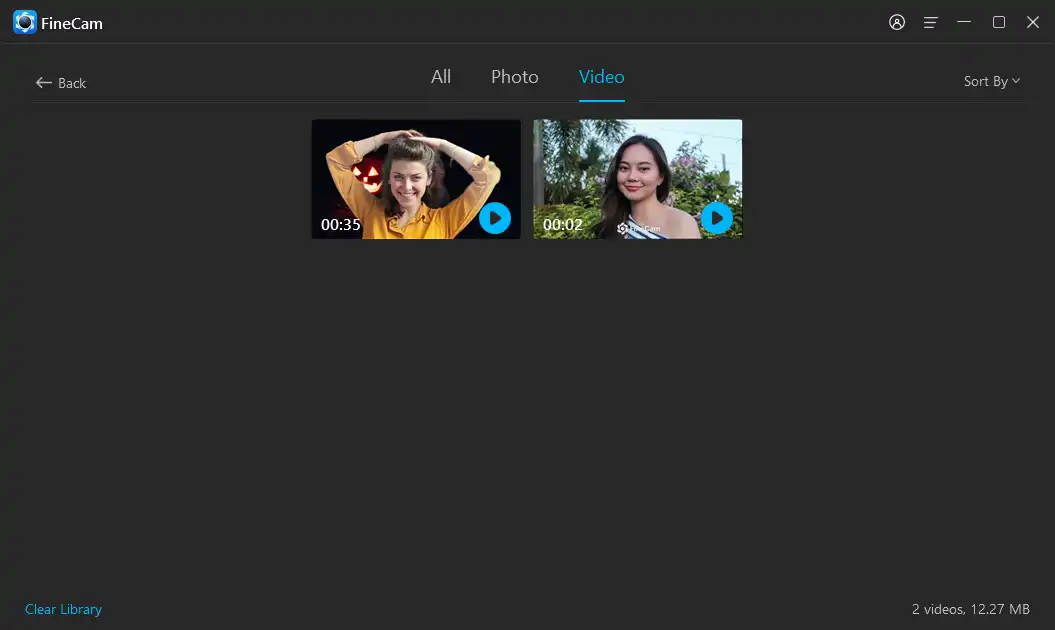
Step 7. Click the hamburger icon on the top right of the main interface, and go to My Library to check all your videos and snapshots.
You can change the save location of your videos in Settings > Record.
You can also add cinematic filters and effects to make you look better in your videos.
Record Video with Virtual Background on Online Meeting Platforms
Another way to record video with virtual backgrounds is to start a meeting directly in some video conferencing platforms, select the virtual background you want to use, and record it. This way you can get a video with virtual backgrounds as well.
Next, I’ll introduce you to several online meeting platforms that offer virtual backgrounds and meeting recording features.
# 1. Zoom
Zoom has three built-in images and two videos for you to replace your video background. Custom images and videos uploading to Zoom are supported.
You can record videos with virtual backgrounds with or without a green screen in Zoom. One thing to note is that Zoom’s green screen background modification is done by color recognition. So, when your skin or clothes resemble the background color, Zoom will replace the parts that shouldn’t be removed with a virtual background.
Let me show you how to record videos with virtual backgrounds in Zoom meetings.
Step 1. Download and install the Zoom desktop application. And then start or join a video conference in Zoom.
Step 2. Click the arrow next to Stop Video at the bottom of the meeting page and click Choose Virtual Background… in the menu.
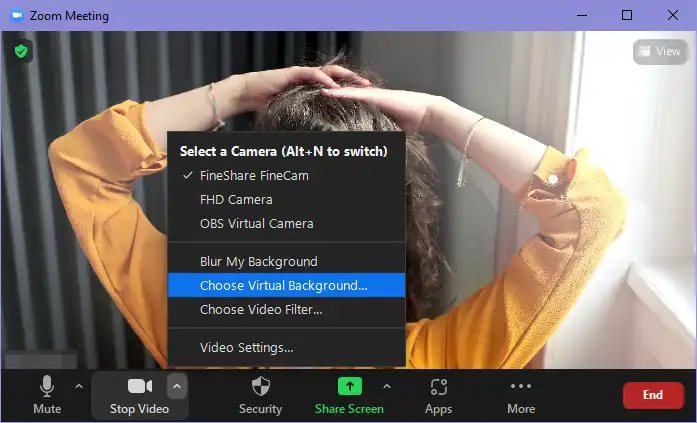
Step 3. You can then select the virtual background you want to use. Click it and you will see the preview of your video with the background. You can upload a custom virtual background by clicking the plus icon on the right.
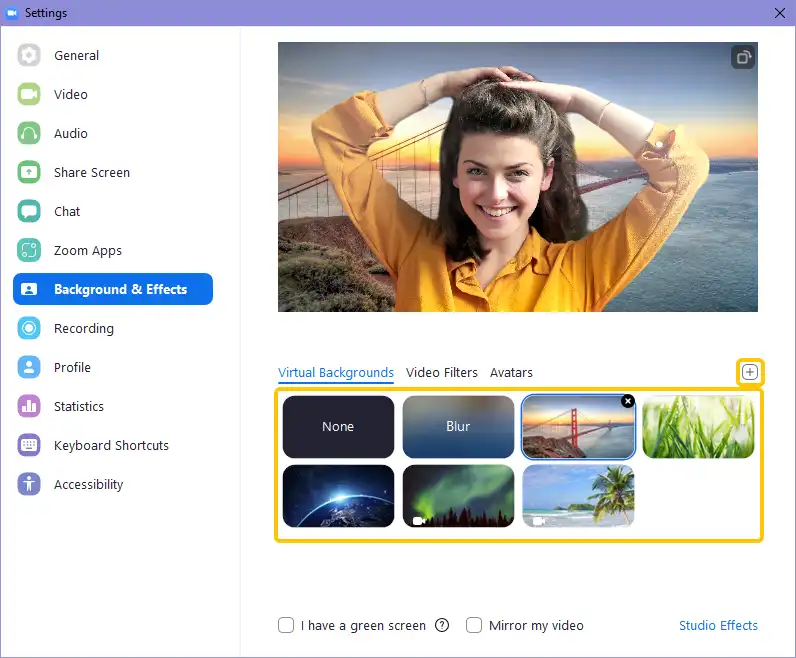
If you have a green screen, please check the I have a green screen box. You will have a better virtual background effect.

Step 4. Close the window to go back to the meeting. To start recording, please find the More button on the bottom toolbar. Click Record on this Computer or press Alt + R on your keyboard, and you will hear the “Recording in progress” message. A flashing Recording… icon will appear in the top left corner of the meeting.
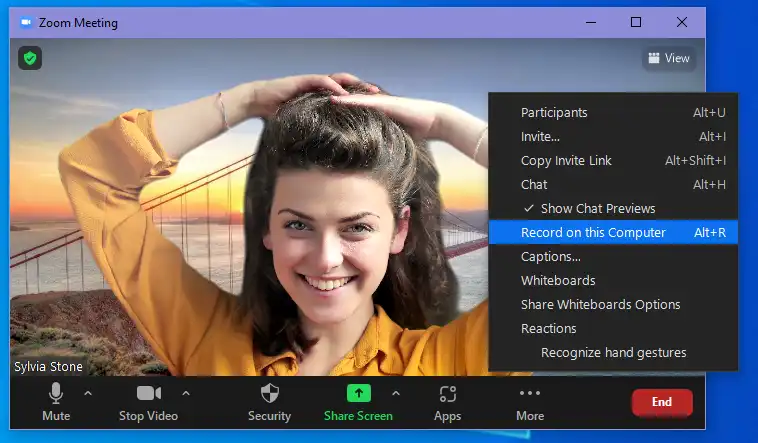
When you want to stop recording, hover your mouse over the icon to pause or stop recording. You will hear a “Recording stopped” when you click them.

Step 5. The recorded Zoom videos will be saved in your Documents folder by default. You can change the settings related to recording in Settings > Recording.
#2. Microsoft Teams
Microsoft Teams is a team collaboration tool used by many large enterprises. It can be used as a video recorder with background for pc. Teams provides more than forty virtual backgrounds in Teams meetings, including business, landscape, animation, and other types.
But all these backgrounds are static images, and you cannot upload videos as virtual backgrounds.
Please refer to the following steps to record videos with virtual backgrounds in Teams.
Step 1. Install and launch the Teams desktop application, because the web version of Teams does not have a virtual background feature.
Step 2. Start or join a Teams meeting. Choose the camera and microphone you want to use in Device settings. Click More at the top of the meeting and select Apply background effects.
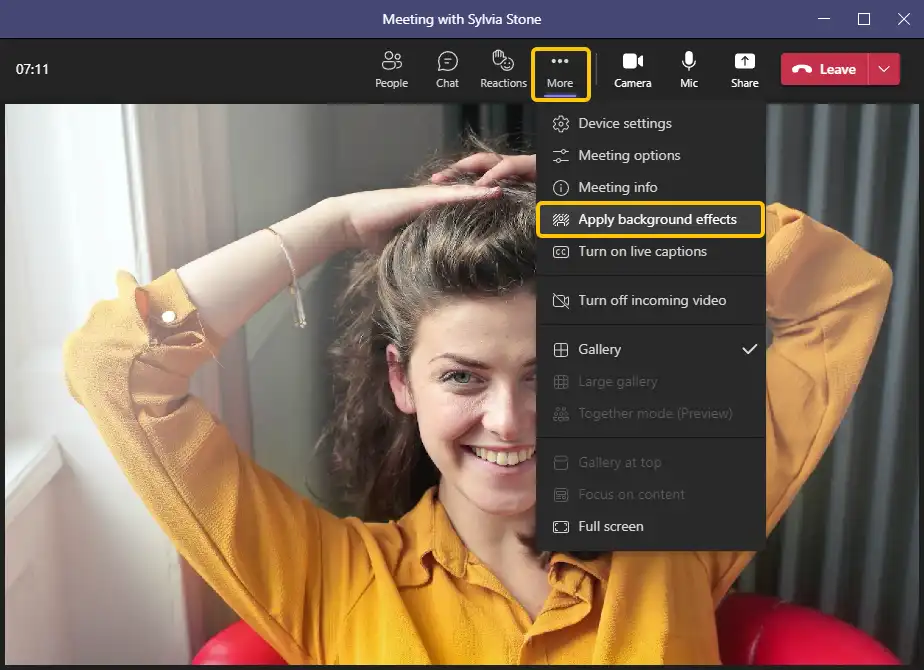
Step 3. All the background effects will appear on the right sidebar. Below the Background settings, you can see various styles of virtual backgrounds, click one to replace your video background and you can preview the effect before applying it. Click Add new to add a custom background.
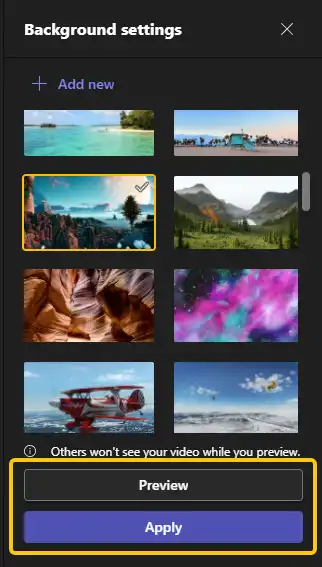
Step 4. The recording function is also in the drop-down menu of More actions.
Click Start recording to start recording the video with a virtual background. When you want to stop recording, click Stop recording in the same place in the More actions menu.
But it’s not anyone who can record a meeting in Teams. For more questions related to Teams recording, you can refer to this article:
Where Does Teams Save Recordings? How to Find Saved Recordings.
Conclusion
This article shows you how to record video with virtual backgrounds. You can use FineCam, a webcam software that offers thousands of virtual backgrounds to choose from and allows you to upload various custom backgrounds.
Or you can record your video with virtual backgrounds with the help of a video conferencing platform that offers both virtual backgrounds and meeting recording features.


