Recording a video on your Mac can be useful for various purposes, such as making tutorials, presentations, vlogs, or podcasts. Whether you want to use your Mac’s built-in webcam or an external camera, there are plenty of apps and tools that can help you capture high-quality video with ease.
Any questions about how to record a video on Mac? In this post, we will show you the 4 best ways to record a video on Mac, along with their pros and cons.
Method 1: How to Record a Video of Yourself on Mac with QuickTime Player
QuickTime Player is a free and versatile app that comes pre-installed on every Mac. It can play various media formats, as well as record audio, video, and screen.
?? Pros:
- Easy and convenient to use
- No additional software required
- Supports various cameras and microphones
- Allows basic editing and trimming of videos
?? Cons:
- Flips the video horizontally by default
- Does not offer any effects or filters
- Limited video quality options
How to record yourself on a Mac using QuickTime Player:
Step 1: Open QuickTime Player from your Finder > Applications folder or Spotlight.
Step 2: Choose File > New Movie Recording from the menu bar.
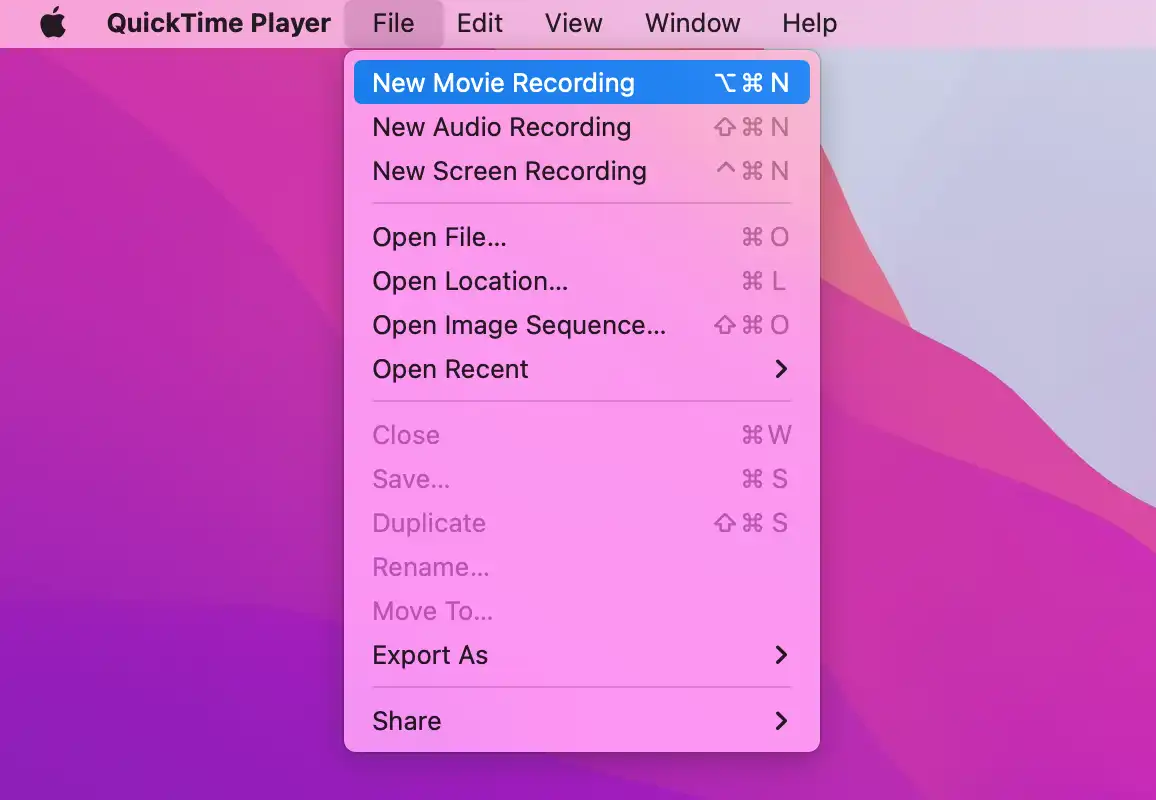
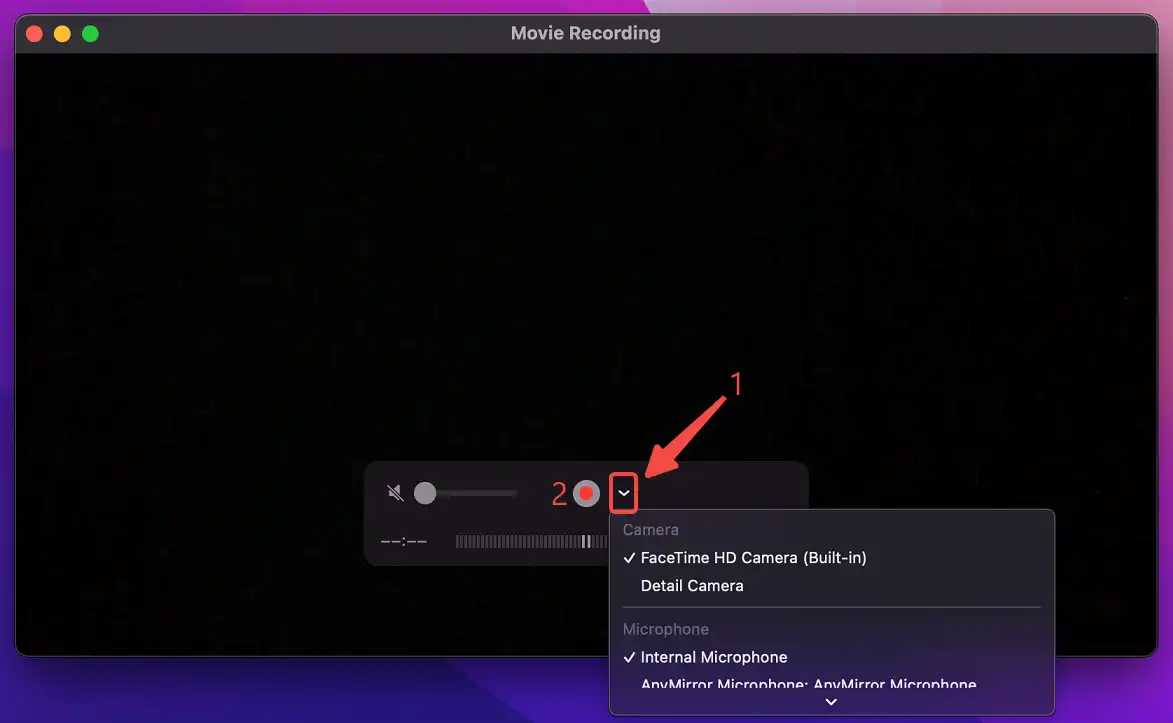
Step 3: You will see a preview of your webcam and a recording button. You can click the arrow next to the button to change the recording settings, such as the camera, microphone, and quality.
Step 4: When you are ready, click the red button to start recording (keyboard shortcut Option-Command-R).
Step 5: To stop recording, click the same button again (Command-Control-Esc).
Method 2: How to Record a Video on Mac with Photo Booth
Photo Booth is another free app that comes with every Mac. It allows you to take photos and videos using your webcam and apply various effects and filters to them.
?? Pros:
- Fun and easy to use
- No additional software required
- Offers various effects and filters for videos
- Does not flip the video horizontally
?? Cons:
- Only works with the built-in webcam
- Does not support external cameras or microphones
- Limited video quality options
How to record video on Mac using Photo Booth:
Step 1: Open Photo Booth.
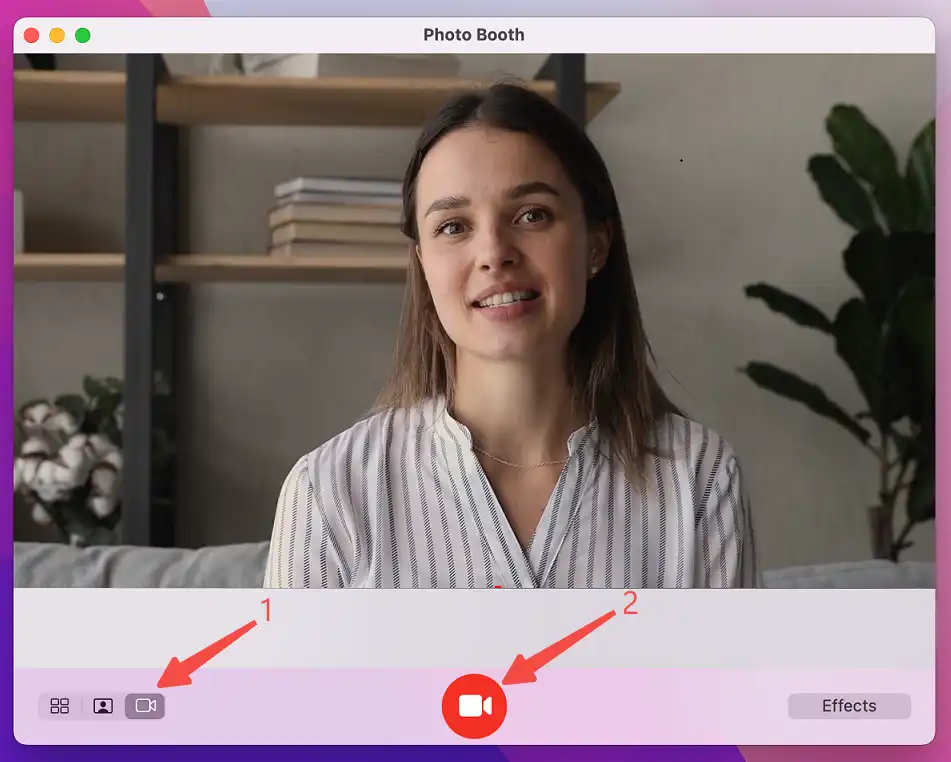
Step 2: You will see a preview of your webcam and a mode switcher. Click the video icon in the bottom-left corner to switch to video mode.
Step 3: You can click the effects button in the bottom-right corner to choose from different effects and filters for your video. You can also use the slider to adjust the intensity of the effect.
Step 4: When you are ready, click the red button to start recording. You will hear a countdown before the recording begins.
Step 5: To stop recording, click the same button again.
FineShare FineCam is a powerful and professional app that allows you to record high-quality videos on your Mac using any camera or microphone.
It also offers features such as using phone as webcam, picture-in-picture, AI background removal with or without a green screen, and more.
?? Pros:
- Easy to use and intuitive user interface
- Offers high-quality video recording
- Supports any camera or microphone
- Customizable adjustments to video image
- Webcam background blur or removal without green screen
- Uses your phone as a webcam with Wi-Fi or USB
- Cinematic filters to make you look better
?? Cons:
- Paid subscription required to unlock pro features
- Requires additional software installation
How to record a video on a Mac with FineCam:
Step 1: Download and install FineCam free version.
Step 2: Connect the camera and microphone devices.
Connect one and more cameras with USB/WiFi. You will see a preview of your camera.
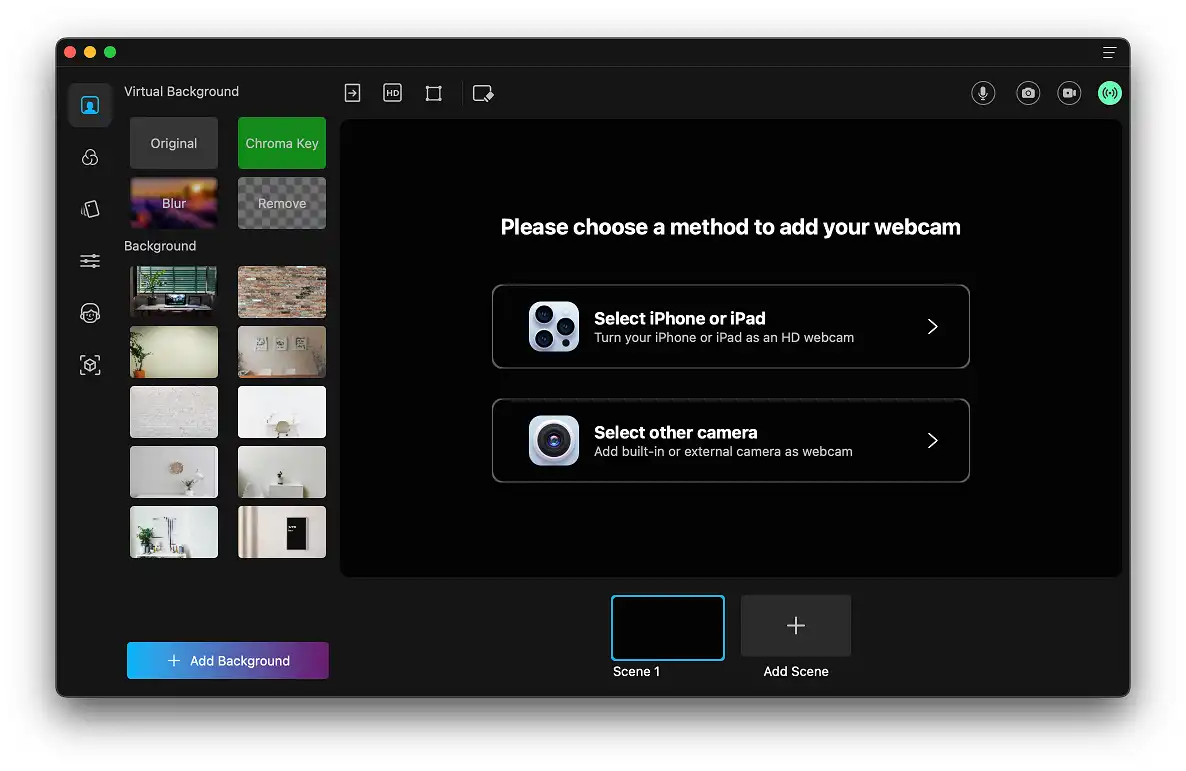
Make sure you have connected the microphone to your computer. And select the microphone you want to capture audio from on the right-top toolbar. (Want to speak with a funny voice? FineShare FineVoice changes your voice into Chipmunk, Minions, SpongeBob’s voice, or professional studio voices.)
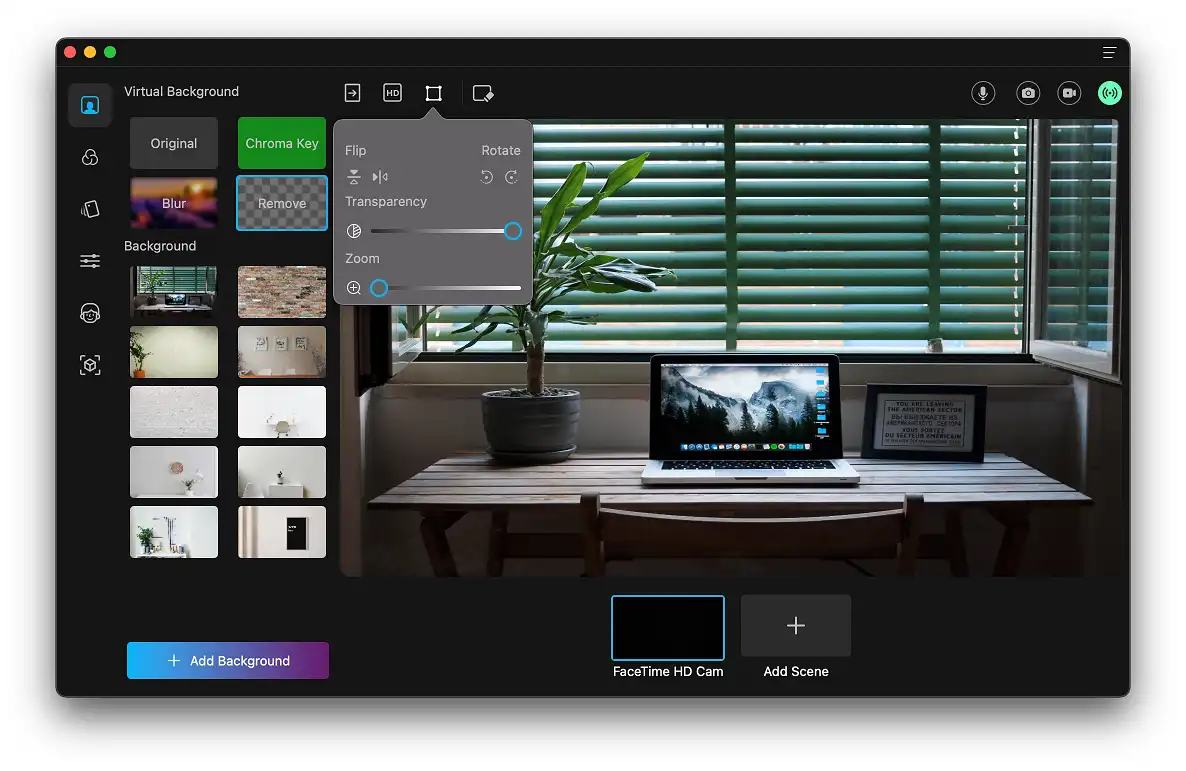
Step 3: Adjust your image.
FineCam helps you flip, mirror or rotate your webcam. And you can also click the gear icon to change the settings, such as recording shortcuts, video resolution, format, etc.
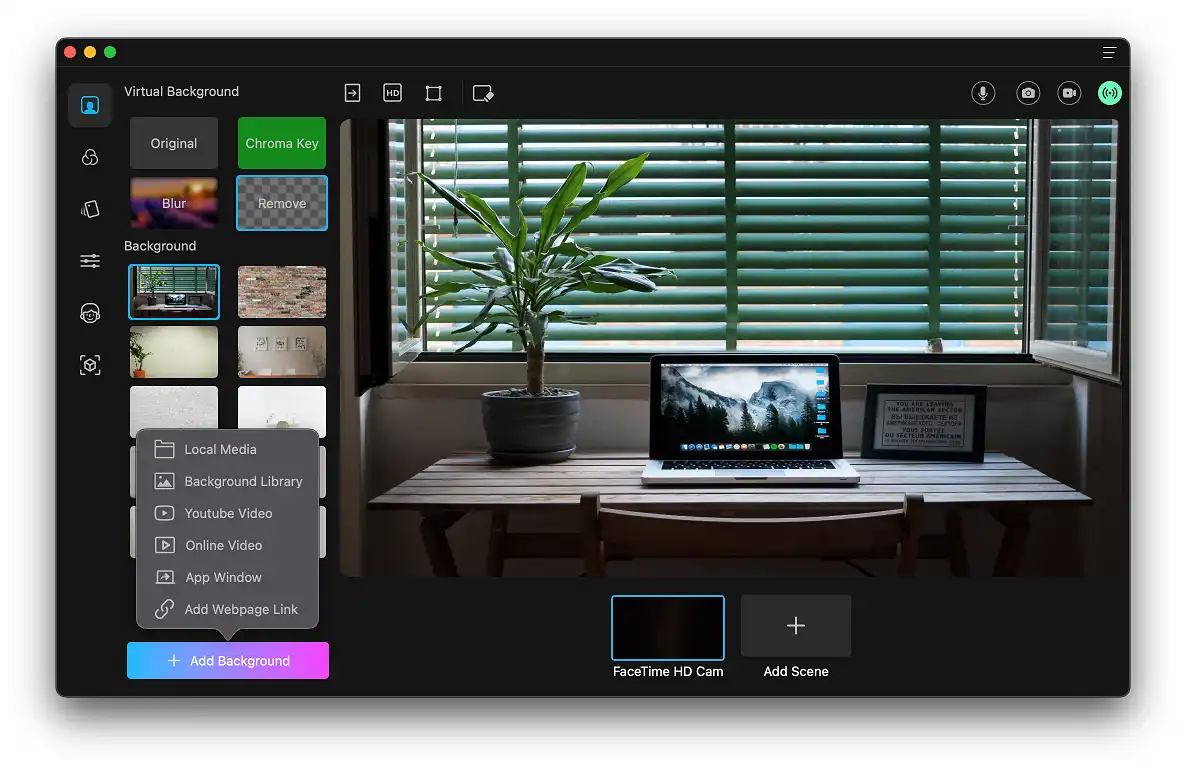
Step 4: Make your video engaging.
On the sidebar, you can find the background, filter, effect, and branding features. Feel free to remove and change the background, and add content like PPT slides, YouTube videos, and app windows to make your video more engaging.
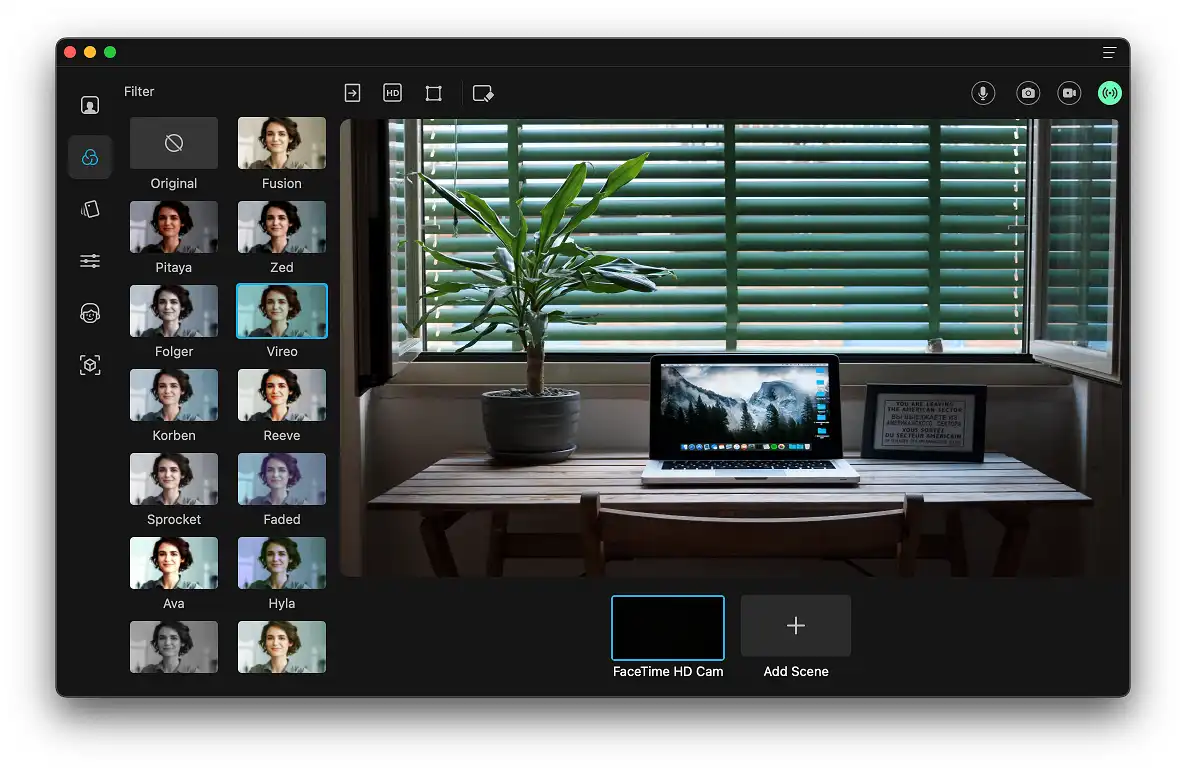
The filters give you more flexibility and fun in video shooting. Add a brand to give your audience a professional impression.
Step 5: Start and stop recording yourself.
When you are ready, click the red button to start recording (keyboard shortcut Command-R if you haven’t changed it).
To stop recording, click the same button again or press Command-W (if you haven’t changed it).
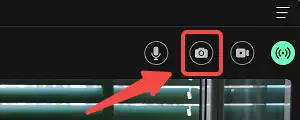
FineCam will automatically save your recording to the local folder and you can find it in My Library.
Method 4: How to Record a Video on Mac with Video Chat Platforms
Video chat platforms are online services that allow you to communicate with other people via video calls. They are mainly designed for social or professional purposes, but they can also be used to record a video on your Mac.
Some of the most popular video chat platforms are Zoom, Microsoft Teams, Google Meet, Omegle, Discord, and Apple FaceTime.
?? Pros:
- Works with any camera or microphone
- Offers various features and options for video calls
- Allows recording of multiple participants
- Supports various platforms and devices
?? Cons:
- May require additional software or account registration
- May have limitations or costs for recording time or quality
- May have privacy or security risks for storing recordings online
To use a video chat platform to record a video on your Mac:
Step 1: Choose a video chat platform that suits your needs and preferences. You may need to download an app or use a web browser to access it.
Step 2: Sign up for an account or log in with your existing credentials. You may also need to grant permission for the platform to access your camera and microphone.
Step 3: Start a video call with yourself or someone else. You can also join an existing meeting or create a new one.
Step 4: Depending on the platform, you may have different options to record the video call. For example, Zoom has a Record button on the toolbar, while Skype has a Start Recording option in the menu.
Step 5: When you are done, end the video call and stop the recording. The platform will usually save and store your recording in a cloud service or a local folder. You can then access, download, or share it as you like.
Important Preparations Before Shooting Video
There are some preparations you need to do before shooting a video, especially if you want to achieve good video quality and sound. Here are some tips:
#1. Choose a high-quality webcam or camera that can capture clear and smooth video.
- You can use your Mac’s built-in webcam, an external webcam, or a digital camera.
- Make sure the camera is properly connected and positioned to capture your face and upper body.
#2. Choose a good microphone that can pick up your voice clearly and reduce background noise.
- You can use your Mac’s built-in microphone, an external microphone, or a headset.
- Make sure the microphone is close enough to your mouth and not covered by anything.
#3. Choose a quiet environment that has minimal distractions and interruptions.
- Avoid places that have loud noises, such as traffic, music, or people talking.
- You can also use a noise-canceling app or device to block out unwanted sounds.
#4. Choose a clean and tidy room that has a simple and professional background.
- Avoid places that have clutter, mess, or personal items that may distract or embarrass you.
- You can also use FineShare FineCam to remove or blur the webcam background without a green screen or replace it with tons of virtual backgrounds.
#5. Choose good lighting that can illuminate your face and make you look natural.
- Avoid places that have too much or too little light, such as direct sunlight, shadows, or fluorescent lights.
- You can also use a ring light or a lamp to adjust the brightness and color of the light.
#6. FineShare FineCam and FineVoice improve your video and voice quality and provide you flexibility if you don’t have much budget to upgrade your camera and microphone.
By following these tips, you can prepare yourself for shooting a video on your Mac and making a good impression on your audience.
Conclusion
Recording a video on your Mac can be done in many ways, depending on your needs and preferences. In this post, we tell you how to record a video on Mac in 4 simple and effective ways.
Whatever method you choose, make sure you have a good camera, microphone, lighting, and background to ensure great video quality.
Look Superb in All Videos
FineCam is an AI-powered virtual camera for Windows and Mac. It makes you look better in Zoom, Teams, YouTube, makes video production easier, and tunrs your phone into an HD webcam. Get it for free.


