Many large companies now use Microsoft Teams as a team collaboration tool. Tens of thousands of people use Teams meetings every day, which makes the Teams camera not working stand out.
What should you do when Teams reports an error that “Microsoft Teams not detecting camera”? We have provided 8 solutions in this article and hope they will help you.
4 Simple Solutions You Can Try
Solution 1. Restart the Teams Program and PC
There is no more convenient way than restarting.
Solution 2. Use the Web Version of Teams
If you are in a hurry, try running MS Teams in a Web browser.
Solution 3. Check How the Device Is Connected
Check if the physical camera switch is forgotten on; disconnect and reconnect the USB camera, or connect your camera through a different port.
Solution 4. Disable Antivirus Software
Sometimes third-party security solutions running on your PC interfere with Teams’ work and do not allow Teams to use the camera.
Solution 5. Check Teams Settings
The following are the steps you can refer to when configuring Microsoft Teams camera devices.
1. Open the Microsoft Teams application.
2. Select the three dots and go to Settings.
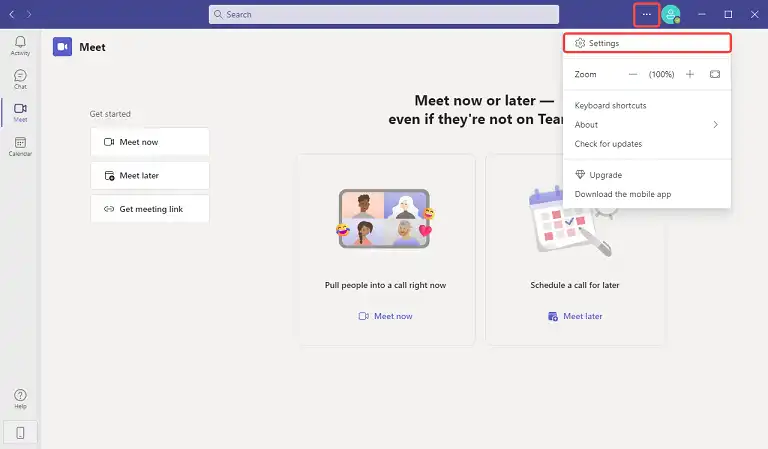
3. Click Devices on the left, scroll down to the Cameras section, click the drop-down menu, and select the camera you want to use.
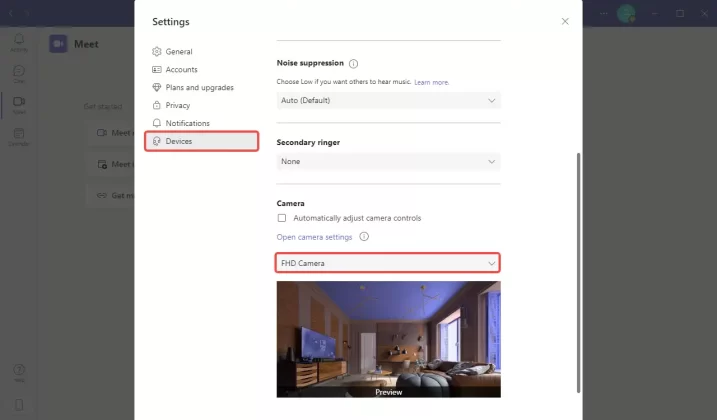
You could check the preview picture to ensure the camera is working properly.
Solution 6. Check Privacy Settings
Another reason why Microsoft Teams camera not working is the lack of privacy permissions. Next, I will show you how to grant the Microsoft Teams application access to the camera depending on the operating system and browser.
On Windows 10:
1. Launch the Start menu, open Settings, and Select Privacy.
2. Under Application Permissions, select Camera.
3. Under Allow access to the camera on this device, click Change to turn on the toggle.
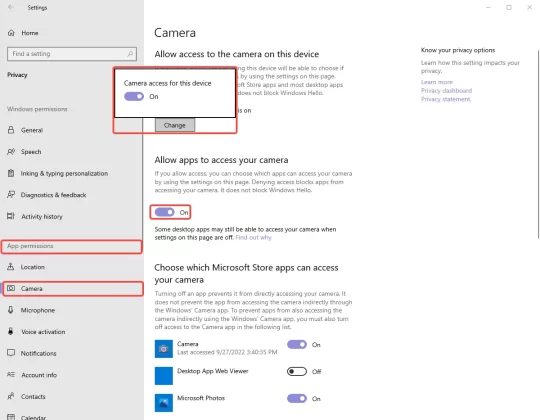
4. Under Allow apps to access your camera, turn on the toggle
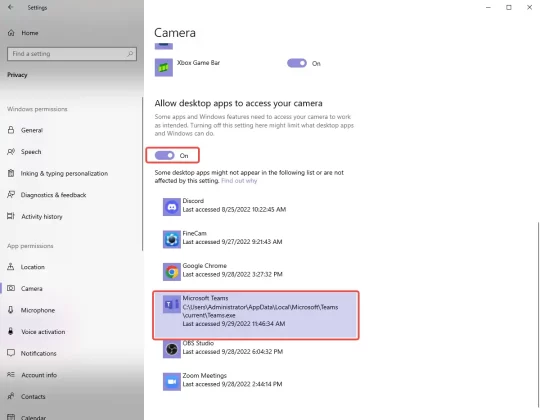
5. Under Allow desktop applications to access your camera, give Microsoft Teams permission.
On a Mac:
1. Launch the Apple menu to select System Preferences > Security and Privacy.
2. Click the Privacy tab and choose Camera in the left sidebar.
3. Click Padlock in the lower-left corner, and turn on the toggle to grant the camera permissions for MS Teams.
(If you have a camera with a built-in microphone, you may also have to configure settings to allow Teams access.)
In Google Chrome:
1. Click the three dots in the upper-right corner.
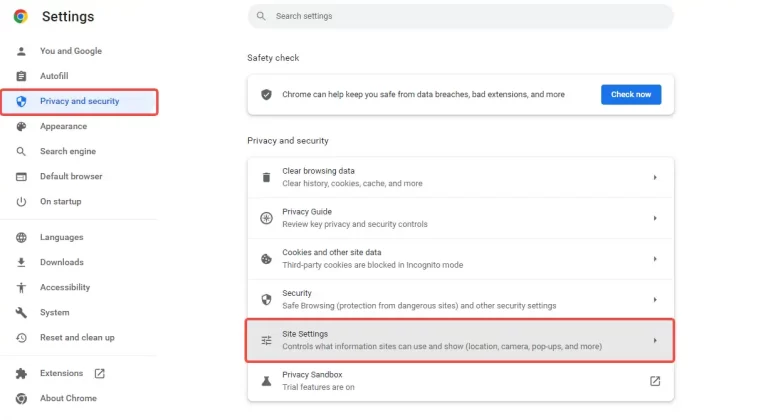
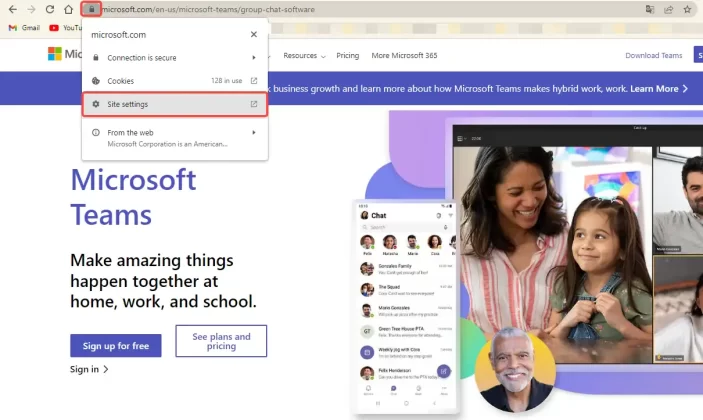
2. Click Settings, and then go to Privacy and Security > Site Settings (Or: In the Run a Team Meeting window, click the padlock icon to jump to Site Settings).
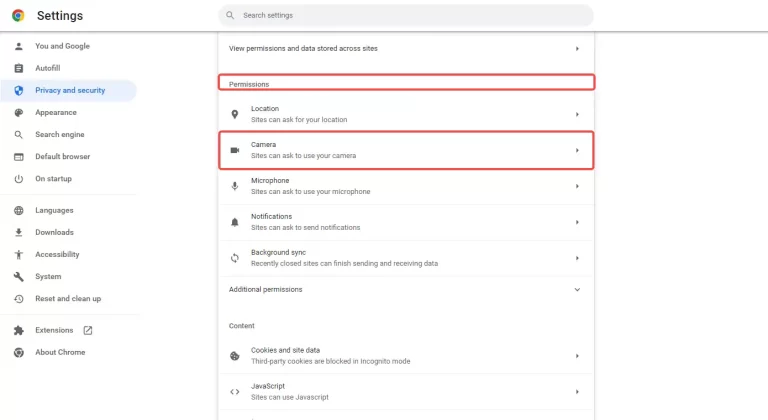
3. Open the Permissions menu, and then select Camera.
4. Select the Microsoft Team site.
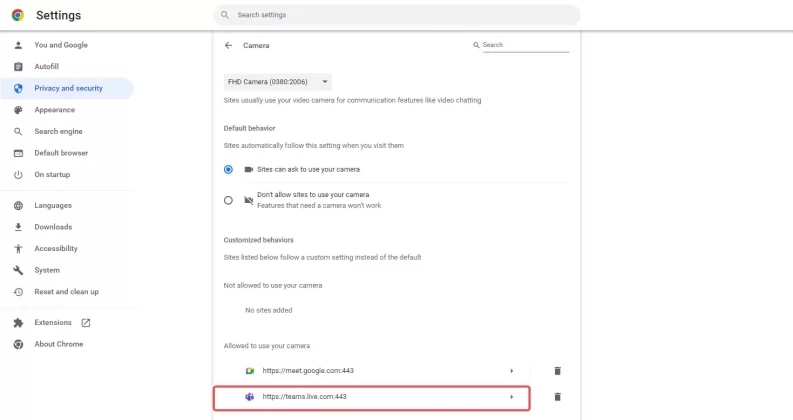
5. Expand the menu next to Camera and Microphone, and then select Allow.
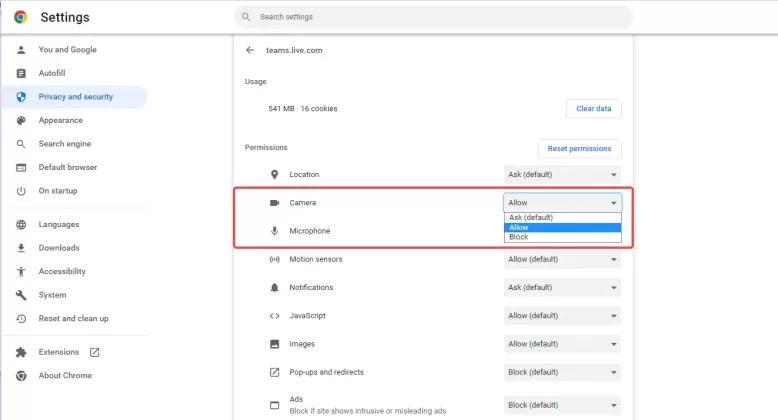
- You should allow Microsoft Teams to access your microphone, because your camera may have a built-in microphone.
- The procedure is much the same on other browsers. And Firefox and Internet Explorer 11 currently support Microsoft Teams for the Web.
Solution 7. Check Operating System Upgrades and Teams Upgrades
Install the latest Windows update or Mac OS update and Teams application version.
How to check updates on windows
1. In Settings, select Update & Security.
2. Click Check for updates. And if you see any pending updates, please install them.
How to check updates on Mac
1. Open the Apple menu and choose About this machine.
2. Go to Software Update, and select Software Update.
3. If you see any available updates, please select Update Now.
How to check Teams updates
The Teams updates are automatic. You can also check for updates manually by doing the following.
1. Open the three-dot menu from the top right corner.
2. Select Check for updates. If an update is available, the application will install it.
3. Restart the Teams app.
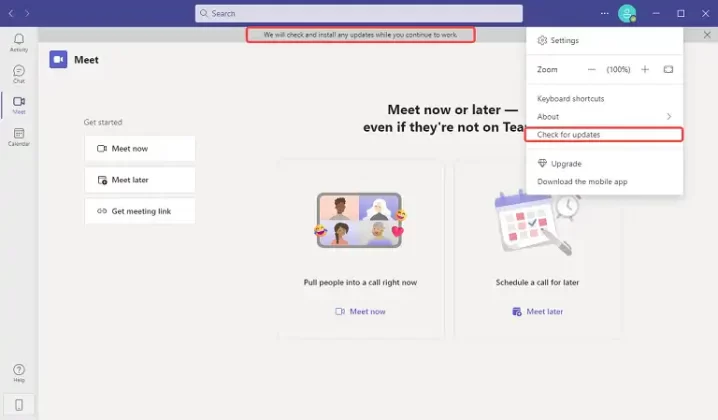
Open Microsoft Teams to check if the Teams camera not working solved.
Solution 8. Disable Default Camera
If you are using an external webcam like FineCam and find that the webcam is undiscoverable, then maybe your default webcam is the problem. This is because the default webcam can often override the external webcam on your computer.
Please refer to the following steps to disable the default camera.
1. Press the Windows Logo + X key combination on the keyboard, and click to select Device Manager from the list.
2. Expand Camera Devices and right-click on your default camera.
3. Select Disable Device.
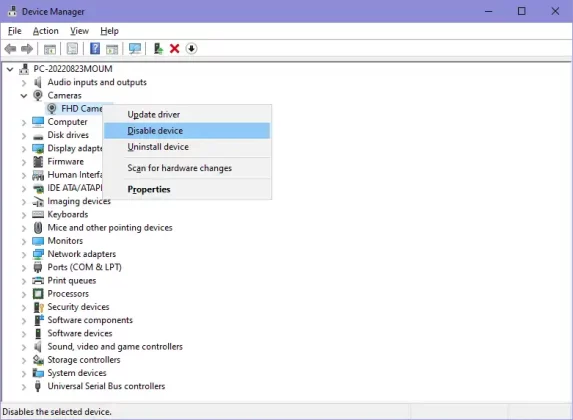
4. Open the Microsoft Teams application and check the working camera.
To re-enable the camera, perform steps 1-2 and then select Enable Device in step 3.
Related article: Use iPhone as HD Webcam Through WiFi/USB
Conclusion
In this article, I’ve told you about 8 solutions for Teams camera not working. Upgrading drivers, and running the Hardware and Device Troubleshooter are also good methods. I hope this article has solved the problem of a camera not working on Microsoft Teams.


