Suppose you encounter problems with your webcam on your PC, what would you do to fix it? The first logical step is to reinstall its drivers, but how do you specifically do that? Do you download the installers on your vendor’s website? Or perhaps go immediately to your Device Manager section to update it?
This article will teach you how to install camera drivers in Windows and reinstall your camera drivers, knowing the reasons involved in each case. Once you’ve read this, you should be able to troubleshoot any camera driver problem in Windows quickly.
Don’t Miss: 12 Common Webcam Problems and How to Fix Them
Part 1. How to Install Camera Driver on Windows PC?
Your first instinct might tell you to go to your webcam’s vendor site and download their driver files. This idea is a good starting point. If your vendor’s file is in .exe file format, you should have an easier time installing it; setup files in .exe automatically execute themselves. The driver files may come with a webcam capture tool software dedicated to the camera hardware. These files go to their corresponding Windows directory through the setup file.
Step 1. Download your camera’s setup program or driver files on its vendor website and save them on your PC.
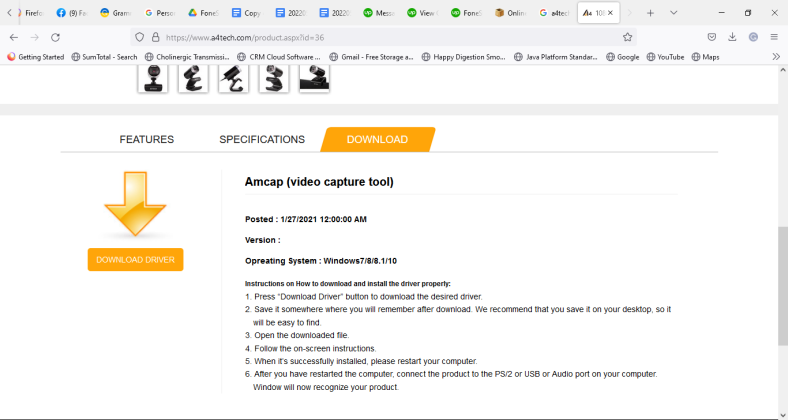
Step 2. Extract its contents if it’s on a zip file. You should now see an executable file.
Step 3. Run this executable file and wait until it finishes. You may have to reboot your PC when asked to do so.
If it’s not a setup file, you may have to get your hands dirty by manually installing the device drivers. Device driver files may come in *.sys, *.inf, and *.cat file extensions. Installing them is very different from setup files, as you’ll see below:
Step 1. If you plug in your camera, your PC may not recognize it. If this happens, go to Device Manager by searching it in the search tool on your taskbar. It may show up as an Unknown device.
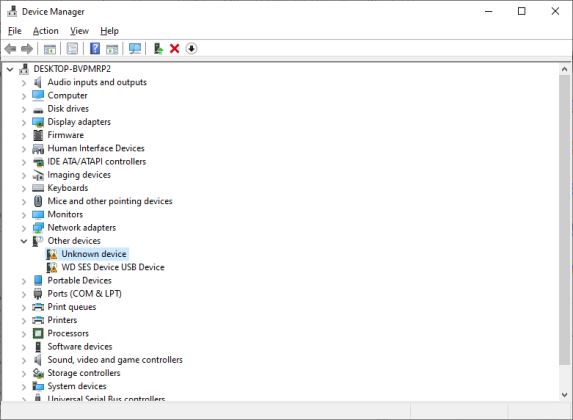
Step 2. Right-click on this and choose Update driver.
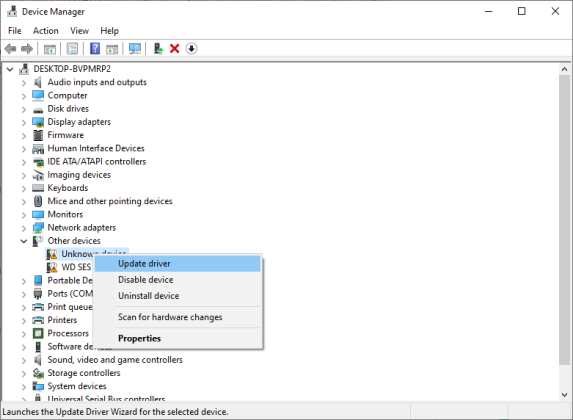
Step 3. Next, a prompt will ask you if you want to search automatically or browse your computer for drivers. Choose to browse your computer for drivers.
Step 4. At this point, point to the directory of your vendor’s driver files that you downloaded earlier. Click Next to continue.
Step 5. If everything goes well, you should see the message that Windows has successfully updated your drivers for you.
Part 2. How to Update Camera Driver?
Sometimes you’ll find that you need to update your camera driver because it’s not working correctly on your system. It could be that the driver files stored on your Windows registry are already outdated. These files need replacement. Windows dedicates a process for this, and it’s called Update Driver. See the steps below:
Step 1. On the search tool in your taskbar, type in “Device Manager.” Once the icon shows up, click Open to launch it.
Step 2. You should see a list of all your devices. Now go to Cameras, then choose your camera.
Step 3. Right-click on this, then press Update Driver.
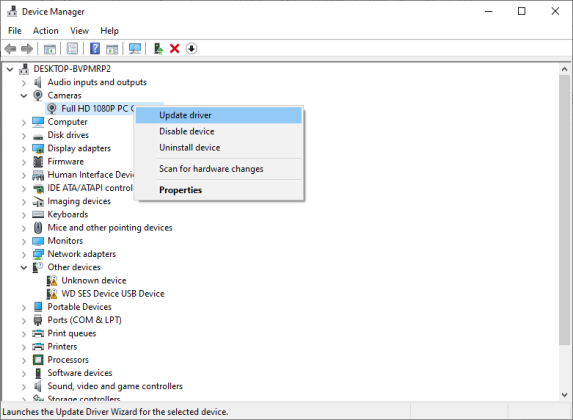
Step 4. Next, a question comes, “How do you want to search for drivers?” It’s good to try ‘Search Automatically for Drivers’ to get drivers compatible with your Windows system. Please wait for it to finish. Consequently, it will tell you if you already have the newest driver installed.
Step 5. If this does not solve your problem, you might have to choose “Browse my computer for drivers.” This option requires you to either download the specific drivers on your vendor’s website or pick them from a list of available drivers already on your PC. If you download your drivers, specify the directory where it’s stored, then click Next. It should say, ‘Windows has successfully updated your drivers when it’s finished.’
Part 3. How to Reinstall Camera Driver?
After finishing the above procedures and you still can’t make your camera work, it’s time to reinstall your camera driver. Reinstalling means removing the previous driver and replacing it with a new one. This process ensures a new clean installation of your camera driver. Once done, this should clear issues regarding your camera’s device driver software.
Step 1. Same as in Part2. How to Update Camera Driver?, go to the search tool in your taskbar, type in “Device Manager,” and then launch it.
Step 2. Go to Cameras, then choose your camera.
Step 3. Right-click on this, then press Uninstall device. This option should uninstall the current camera driver on your Windows registry. Once finished, you will not be able to use your device for the moment.
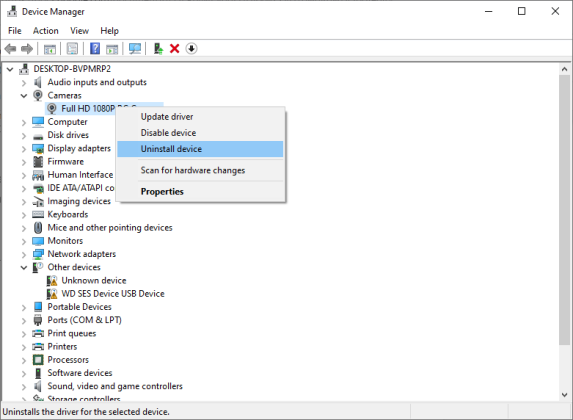
Step 4. You can now install your preferred camera device driver using Part 1. How to Install Camera Driver on Windows PC or simply reboot your PC so that the same device driver will automatically install upon boot-up (while it’s still connected to your PC).
Conclusion
This article demonstrated how to install camera drivers in Windows, the process involved, and the different situations you can get into. Once you familiarize yourself with the process, you should be able to troubleshoot common camera device driver problems quickly. As a reminder, it’s essential to enable Windows Update on your PC to always have the latest device drivers in your system.


