So, you’ve just connected your webcam, but your Windows PC is not showing any connection. Or your laptop has suddenly stopped showing your built-in webcam. Either the case, it is quite head-scratching for you to figure it out.
You probably thinking to take it to the nearest repair shop, but before that, maybe you can easily fix it by following these 5 methods we’ve listed in this article. Let’s get into the solution to fix your not-detected webcam.
Your Webcam Cannot Be Detected? Why
Webcam detecting problem is one of the common camera problems for PC users. Finding the cause of the problem is necessary as it can save you from future malfunctioning. If your webcam doesn’t work, it could be due to the following reasons.
- Hardware malfunctioning.
- Outdated or missing driver.
- Privacy concerns.
- Antivirus software issues.
It is common for Windows to automatically install device drivers when it discovers new hardware. However, you may still have to manually update your hardware drivers if you just switched to Windows 10. On the other hand, some Windows Store apps only work with newer webcams, so your older one might not work. While most desktop programs still work with older cameras.
How to Fix if Laptop Webcam Not Detected
Below is a list of different solutions for every possible issue. If your laptop camera is not detected, follow any of the methods below to solve it instantly.
1. Allow Camera Access from Webcam’s Settings
There are options in the Windows System Settings, that you can use to disable and restrict applications’ access to the webcam. These settings influence not only Microsoft Store programs but also known as UWP (Universal Windows Platform) applications and applications from other sources.
Consequently, if your webcam is not detected, you must ensure that camera access is allowed. Follow the straightforward steps below:
Step 1. Right-click the Start button or press the Windows key + X on the keyboard.
Step 2. Select Settings from the drop-down menu. (You may also launch the Settings app more quickly by tapping the Windows logo key plus the letter I.)
Step 3. Click Privacy when you’re in the Settings app’s main panel. It is presented at the page’s bottom.
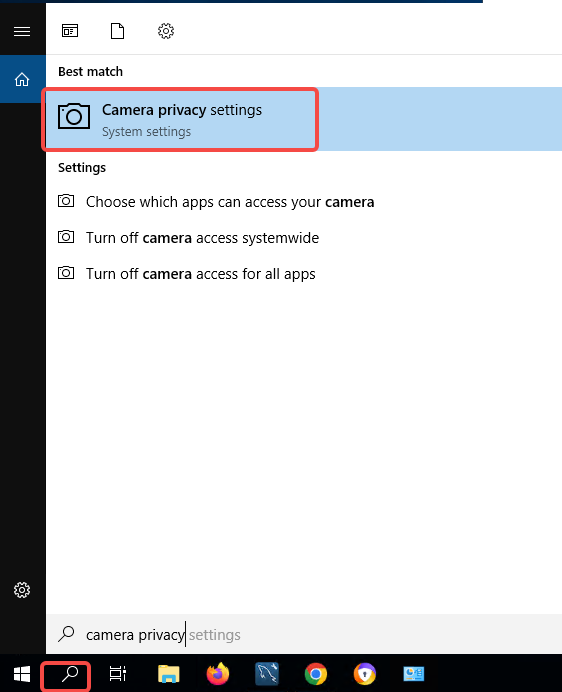
Fix Camera Not Detected – Camera Privacy
Step 4. Click Camera, on the left pane of the page that opens, under App permissions.
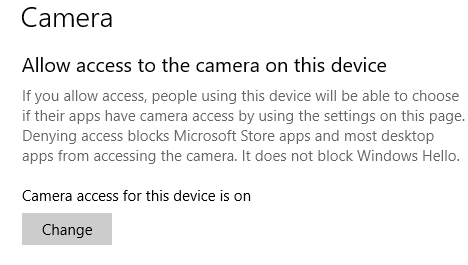
Allow Access to The Camera on This Device
On the right side of the page, a checkbox is labeled Allow access to the camera on this device. Ensure to enable the access. Alternately, click the Change button and toggle the switch to enable camera access.
Step 5. If the option Camera access for this device is off, neither Windows nor apps on your PC will be able to identify the webcam. This implies that Windows Hello (the facial recognition technology that provides faster and more secure device logins than a password) cannot function.
Step 6. Ensure that Allow apps access to your camera is also toggled on. For this:

Fix Camera Not Detected – Allow Apps to Access
Step 7. Under Choose which applications can access your camera, choose all the apps on the list or the ones you wish to grant access to your webcam.
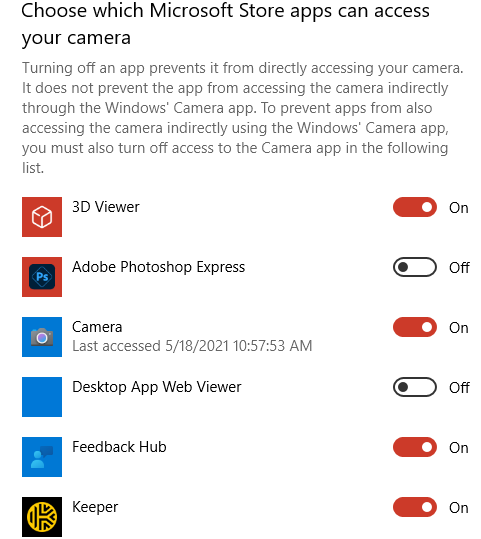
Fix Camera Not Detected – All Apps to Access Your Camera
2. Enable Your Webcam Driver
Check whether you’ve enabled your camera to run on your Windows laptop. If not, just enable it.
Step 1. Open Device Manager. Click the Start menu with the right mouse button, press Win + X, or directly search it from the Windows search bar.

Device Manager
Step 2 Expand the Cameras, Imaging Devices, Video, or Gaming Controllers.
Step 3. Click the right button and select Enable Device.
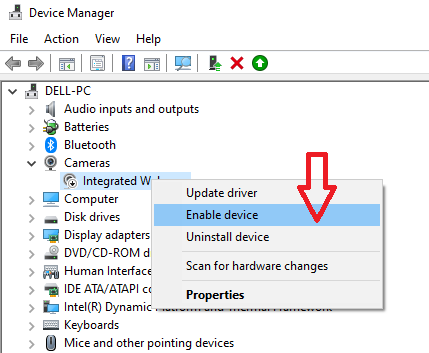
Fix Camera Not Detected – Enable Camera
3. Reinstall the Webcam Driver
If your laptop camera is not detected, try removing and replacing the driver for your webcam to see if that resolves the issue. Follow the simple steps below:
Step 1. Go to Device Manager and find your Camera device.
Step 4. Select Uninstall Device which appears when you right-click your integrated webcam device from the context menu.
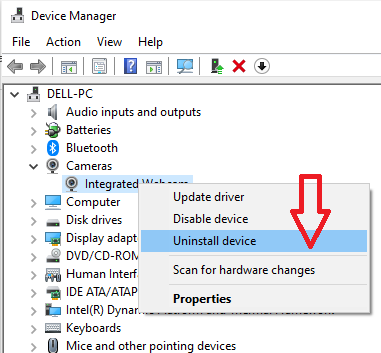
Fix Camera Not Detected – Uninstall Webcam Driver
Step 5. You will see a warning that states, You are going to uninstall this device. Select Uninstall from the menu.
If you choose the checkbox labeled Delete the driver software for this device (if available), Windows will need to re-download the device driver.
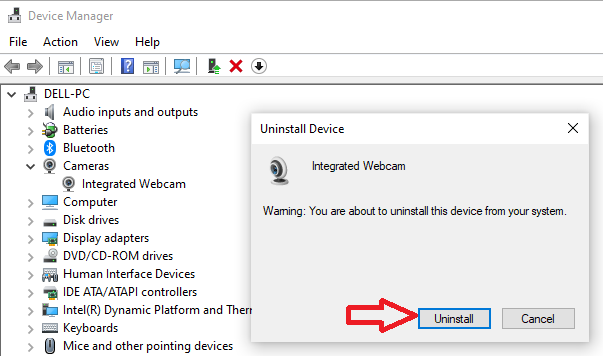
Fix Camera Not Detected – Confirm Uninstall Driver
Step 6. Windows will install the undetected camera driver automatically upon a restart. After reinstalling the driver, verify that your applications can identify the webcam.
If Windows fails to automatically install the camera driver after you uninstall it, you must do the following:
Access the Device Manager. Click Scan for Hardware Changes after right-clicking on the Actions tab (the second item on the top).
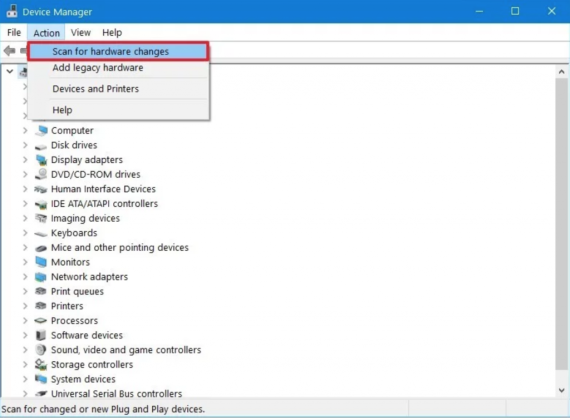
Fix Camera Not Detected – Scan for Hardware Changes
4. Restore the Previous Webcam Driver
The Device Manager allows you to remove the current driver of any hardware device and reinstall the driver from a prior version. This option is available because sometimes, the most recent drivers are flawed. However, it is recommended that you constantly update your drivers, as newer versions are typically enhancements.
If you have upgraded your camera driver, it is advisable to roll it back, as the update could be the core of the problem. Follow the instructions below to roll back the driver for your integrated webcam:
Step 1. Go to Device Manager.
Step 2. Select Properties from the context menu by right-clicking on your webcam device.
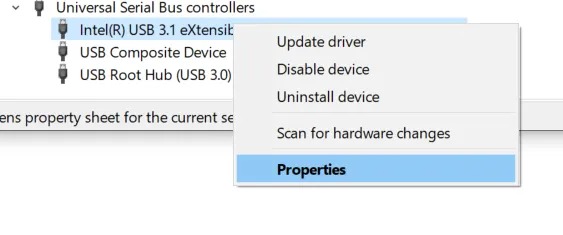
Fix Camera Not Detected – Webcam Properties
If your integrated webcam device is not listed under Imaging Devices, try for it under Sound or Camera, video, and gaming controllers.
Step 3. In the Properties window of the webcam, select the Driver tab.
Step 4. Follow the on-screen prompts after clicking the Roll Back Driver button.
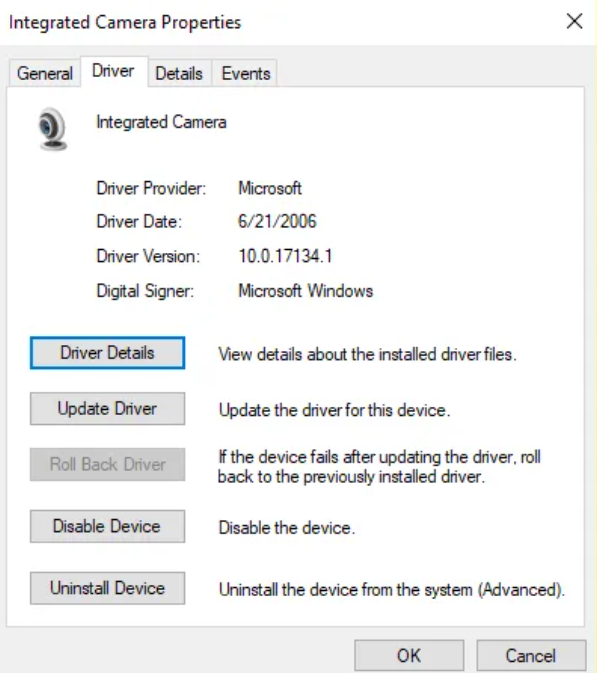
Fix Camera Not Detected – Roll Back Driver
If the Roll Back Driver button is inactive, no earlier driver version is accessible.
5. Temporarily Disable Your Antivirus Software
Your antivirus software may block your webcam if it detects some malicious process. You can temporarily turn off the antivirus program to check whether your webcam can be detected. If it works normally after that, this means you may need to add an exclusion using your antivirus program.
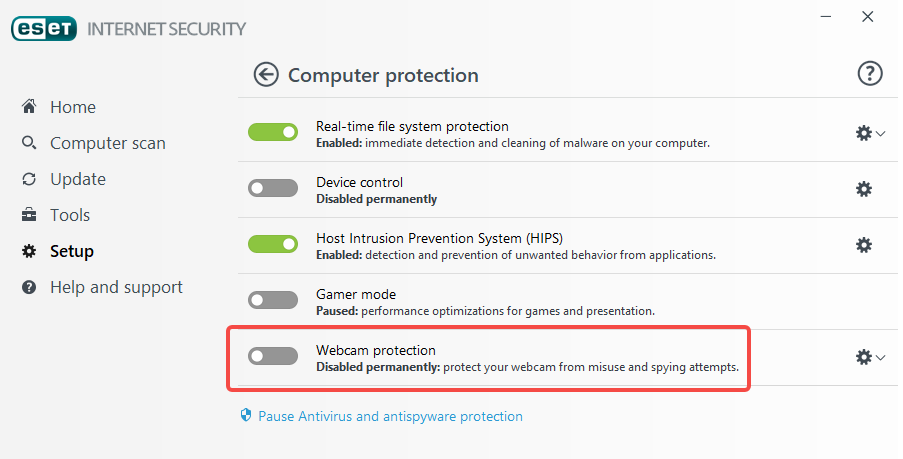
Disable Webcam Protection – Antivirus Software
Final Thoughts
Webcam not detected by your PC or laptop can be due to malfunctioning or improperly installed drivers. Now you know how to troubleshoot the issue in no time. We hope any one of the above will solve your problem. However, if nothing helps there is one more option. Connect it to a different computer and observe the results. If something does not work, it is likely gone.

